Knowledge Base
 All
Content
All
Content
How to use shortcuts for Director device
Article ID: 0008020003
Director Mini, Director One


Since V3.2, Director device supports the MiraBox Stream Dock 293 for plug-and-play control. Just add your desired shortcuts, no need to assign key binds. Once set up, simply connect your MiraBox Stream Dock to the Director device, all shortcut icons and layout are synchronized to the Stream Dock, and you can use it for instant control.
You can also connect a common USB or Bluetooth keyboard, such as X-Keys and NumberPad, and create Shortcuts to control the device more easily.
To connect a Bluetooth keyboard to the device, please go to ![]() > Settings > Bluetooth, tap
> Settings > Bluetooth, tap ![]() and then connect the Bluetooth keyboard according to the introduction on the interface.
and then connect the Bluetooth keyboard according to the introduction on the interface.
E.g. 1: Add shortcuts on device (V3.2 and above):
- Go to
 > Settings > Shortcuts.
 - Tap
 .
.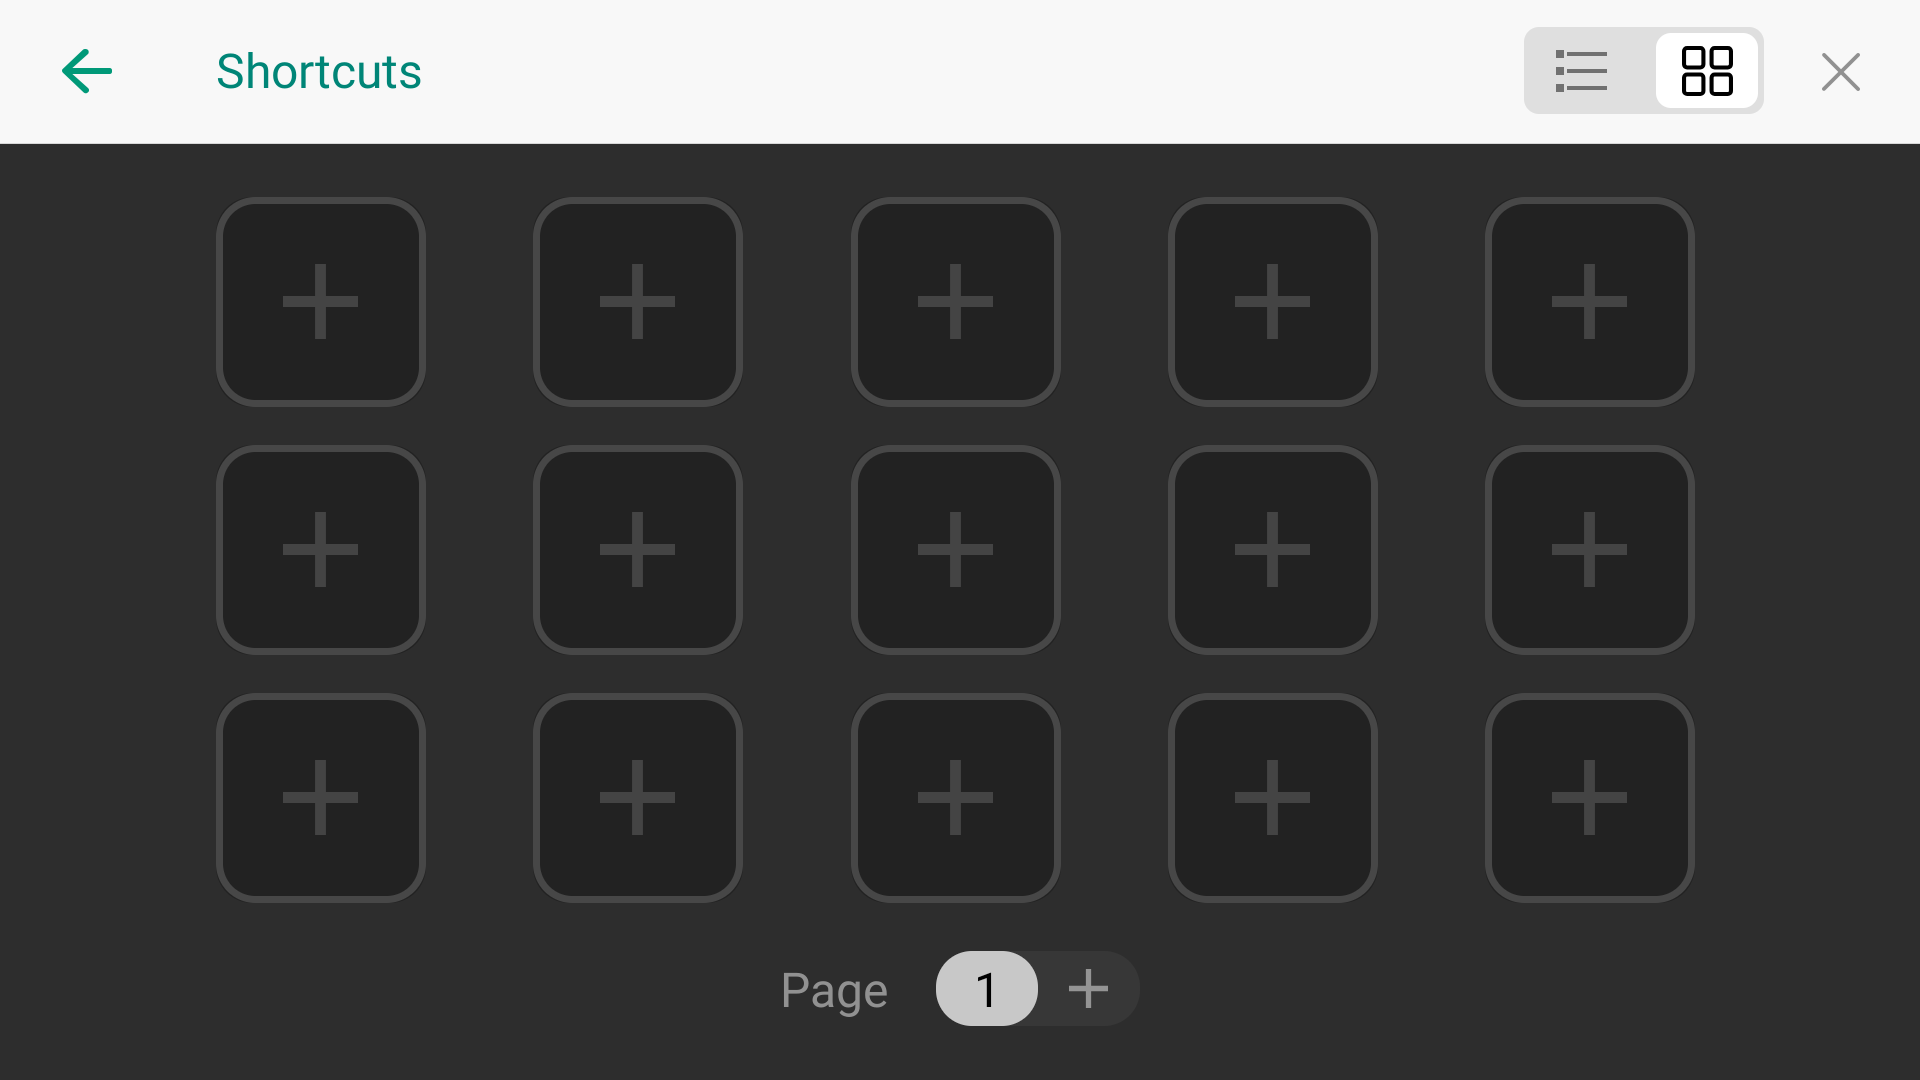
- Add a function:
- Select a function category from the list on the left side, and then choose a function on the right side. For some functions, additional selections or operations are required; please follow the on-screen prompts to proceed. Tap the buttons in the upper right corner to switch between list mode and thumbnail mode.
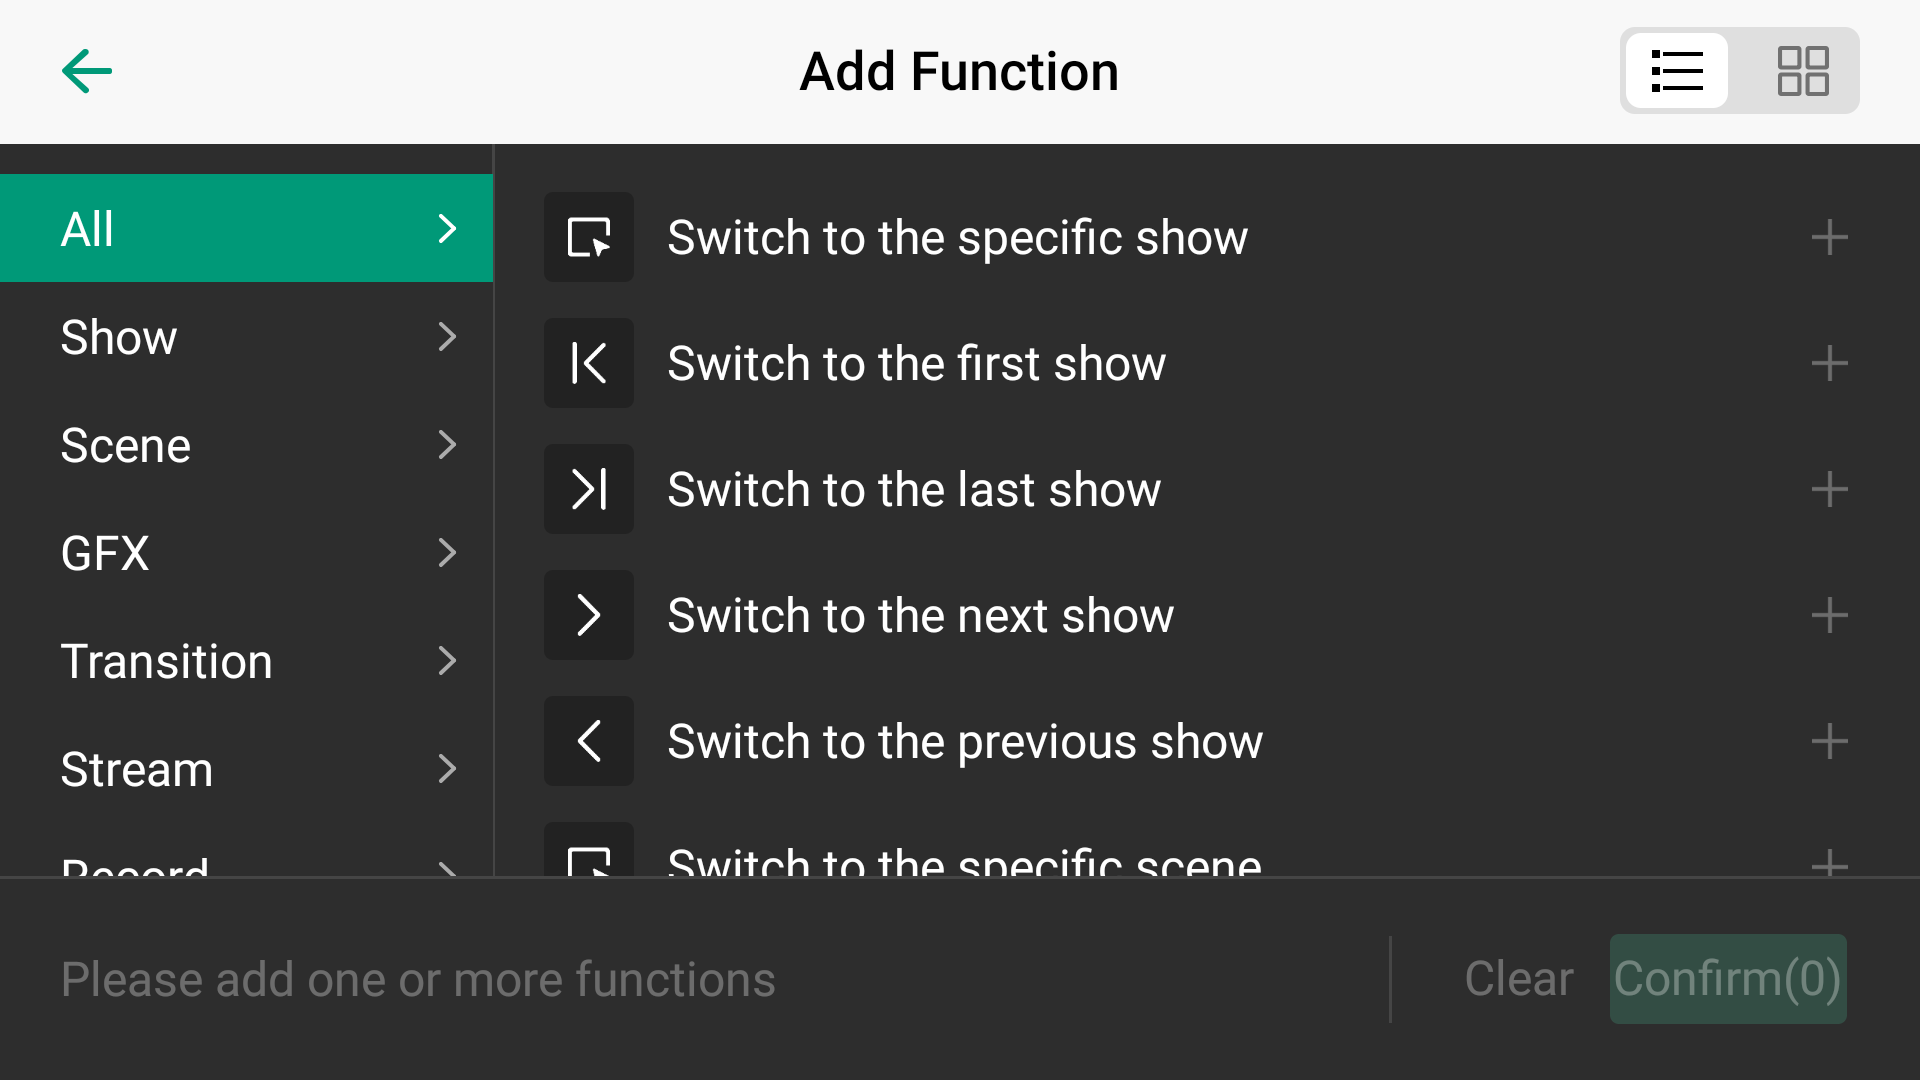
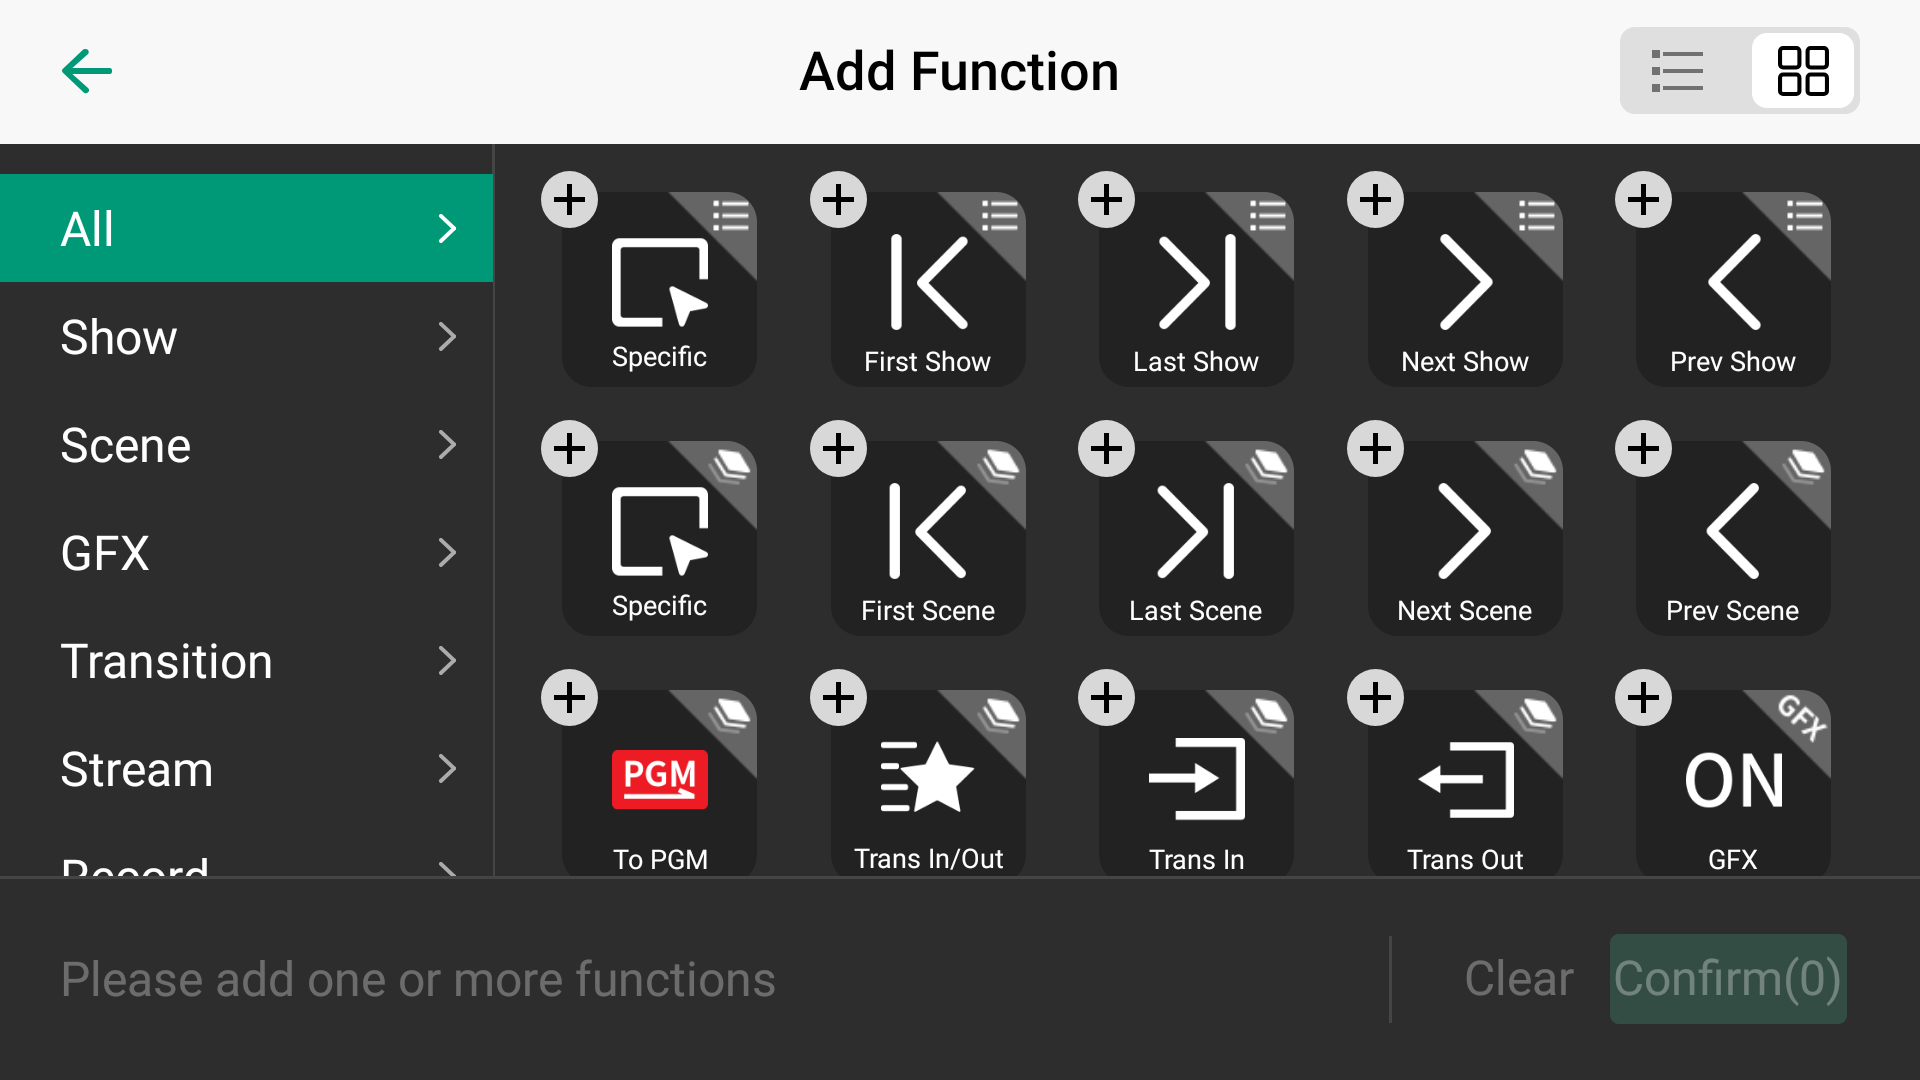
- You can add multiple functions for one shortcut.
-
The extra "Wait" function can be added between each two functions. By setting the wait duration, a group of functions can be activated sequentially with a single press, allowing them to take effect one by one.
-
The "Next page", "Previous page" and "Go to page N" functions can help you turn pages on the MiraBox Stream Dock.
- A list of selected function icons is displayed at the bottom. You can long-press an icon to drag and reorder it, and tap "X" to delete it. To remove all the functions, tap Clear.
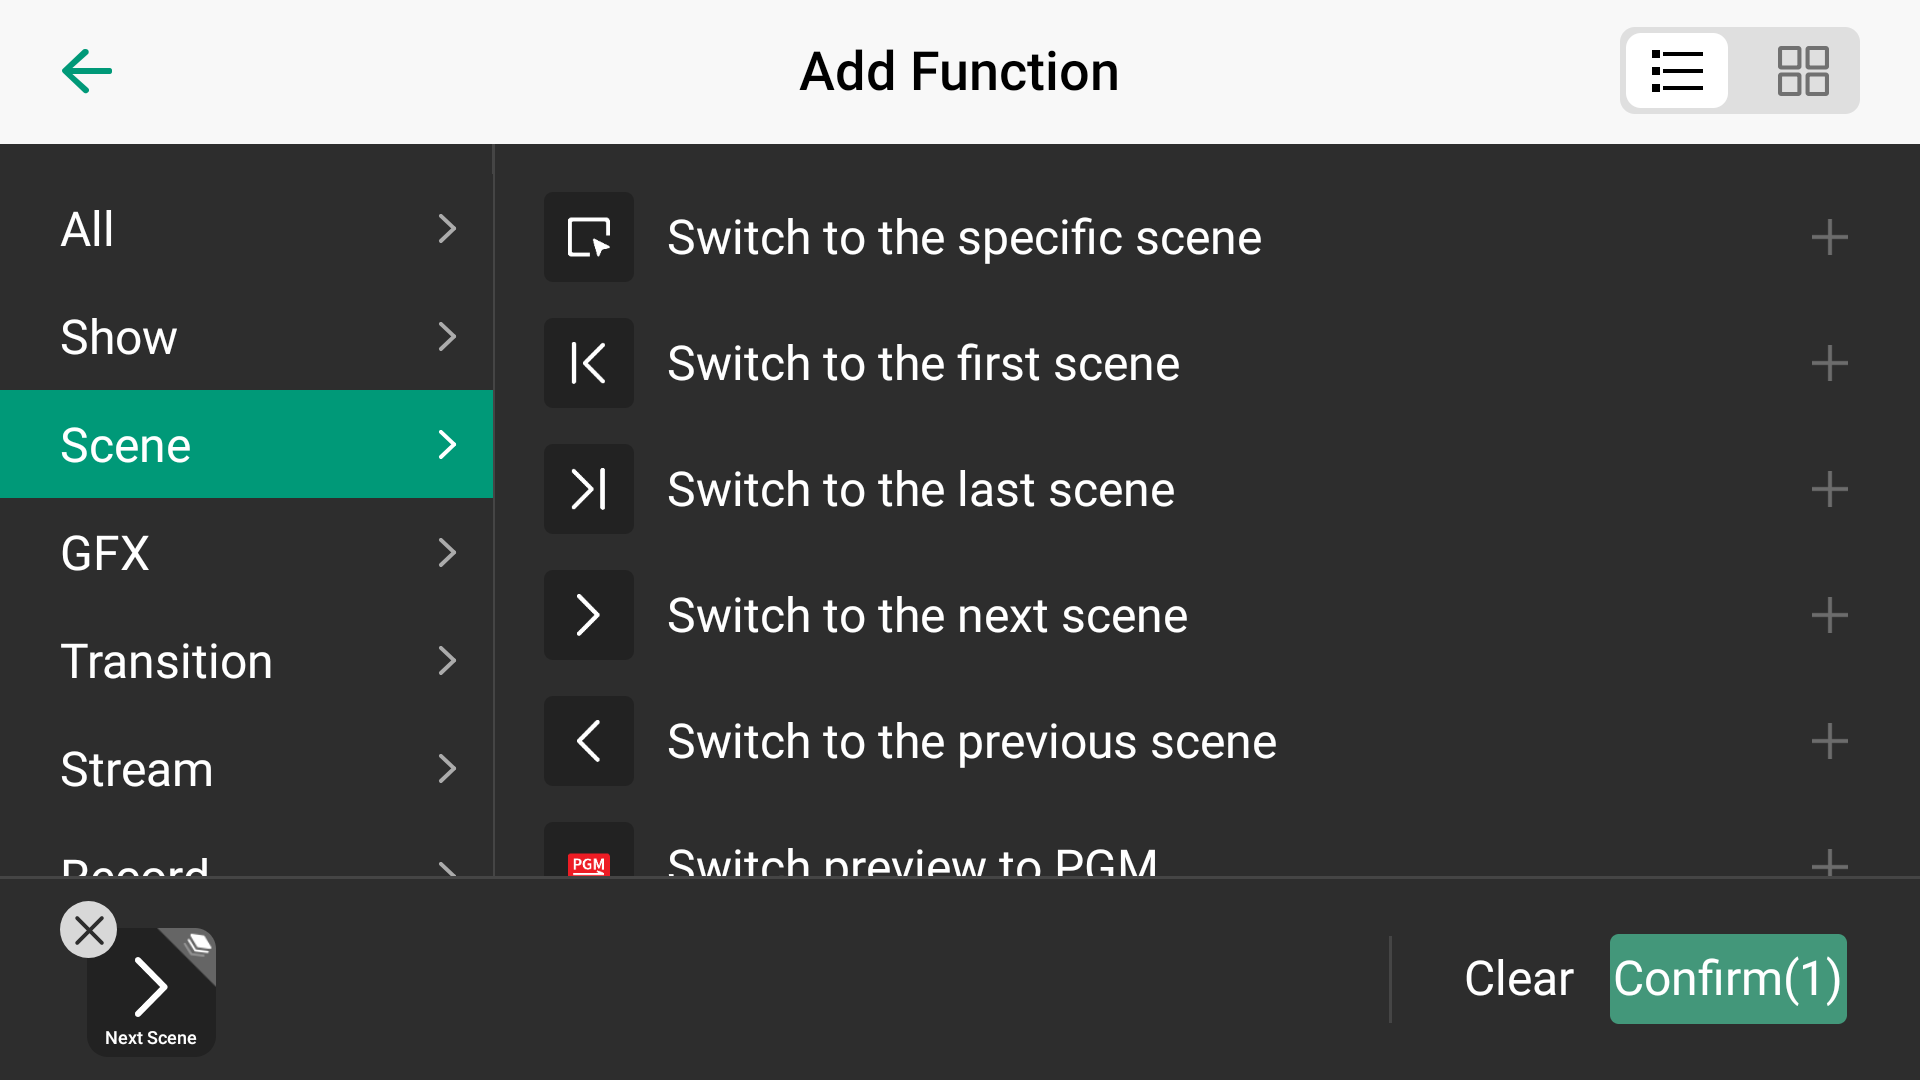
- After completing the function addition, tap Confirm.
You can see the added function in the "Function" area, and you can tap the icon to modify the function.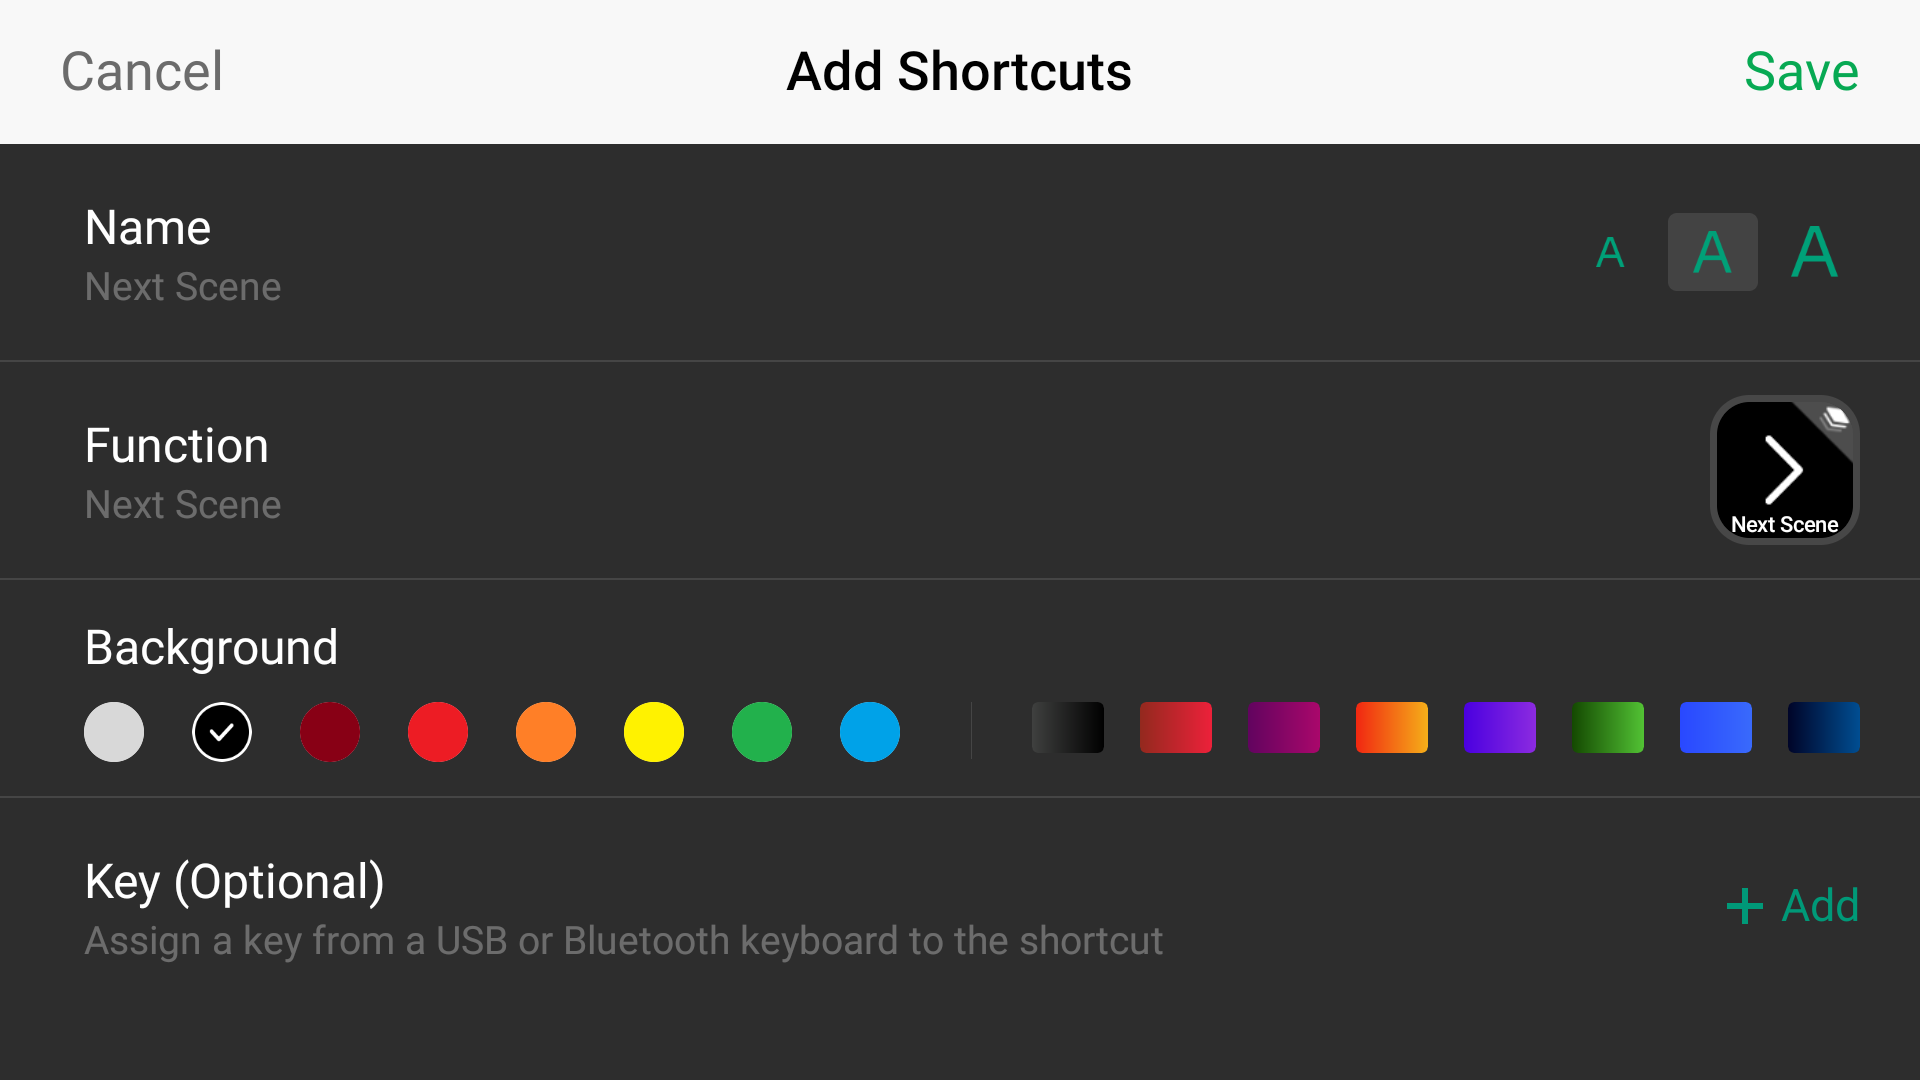
- Select a function category from the list on the left side, and then choose a function on the right side. For some functions, additional selections or operations are required; please follow the on-screen prompts to proceed. Tap the buttons in the upper right corner to switch between list mode and thumbnail mode.
- (Optional) Tap Name to enter a custom name for your shortcut. Tap "A" at the right side to change the font size.
- (Optional) Set a solid or gradient background color for the shortcut icon.
- (Optional) For a common keyboard, such as X-keys or NumberPad, connect it to the device, then tap + Add on the right side of "Key":
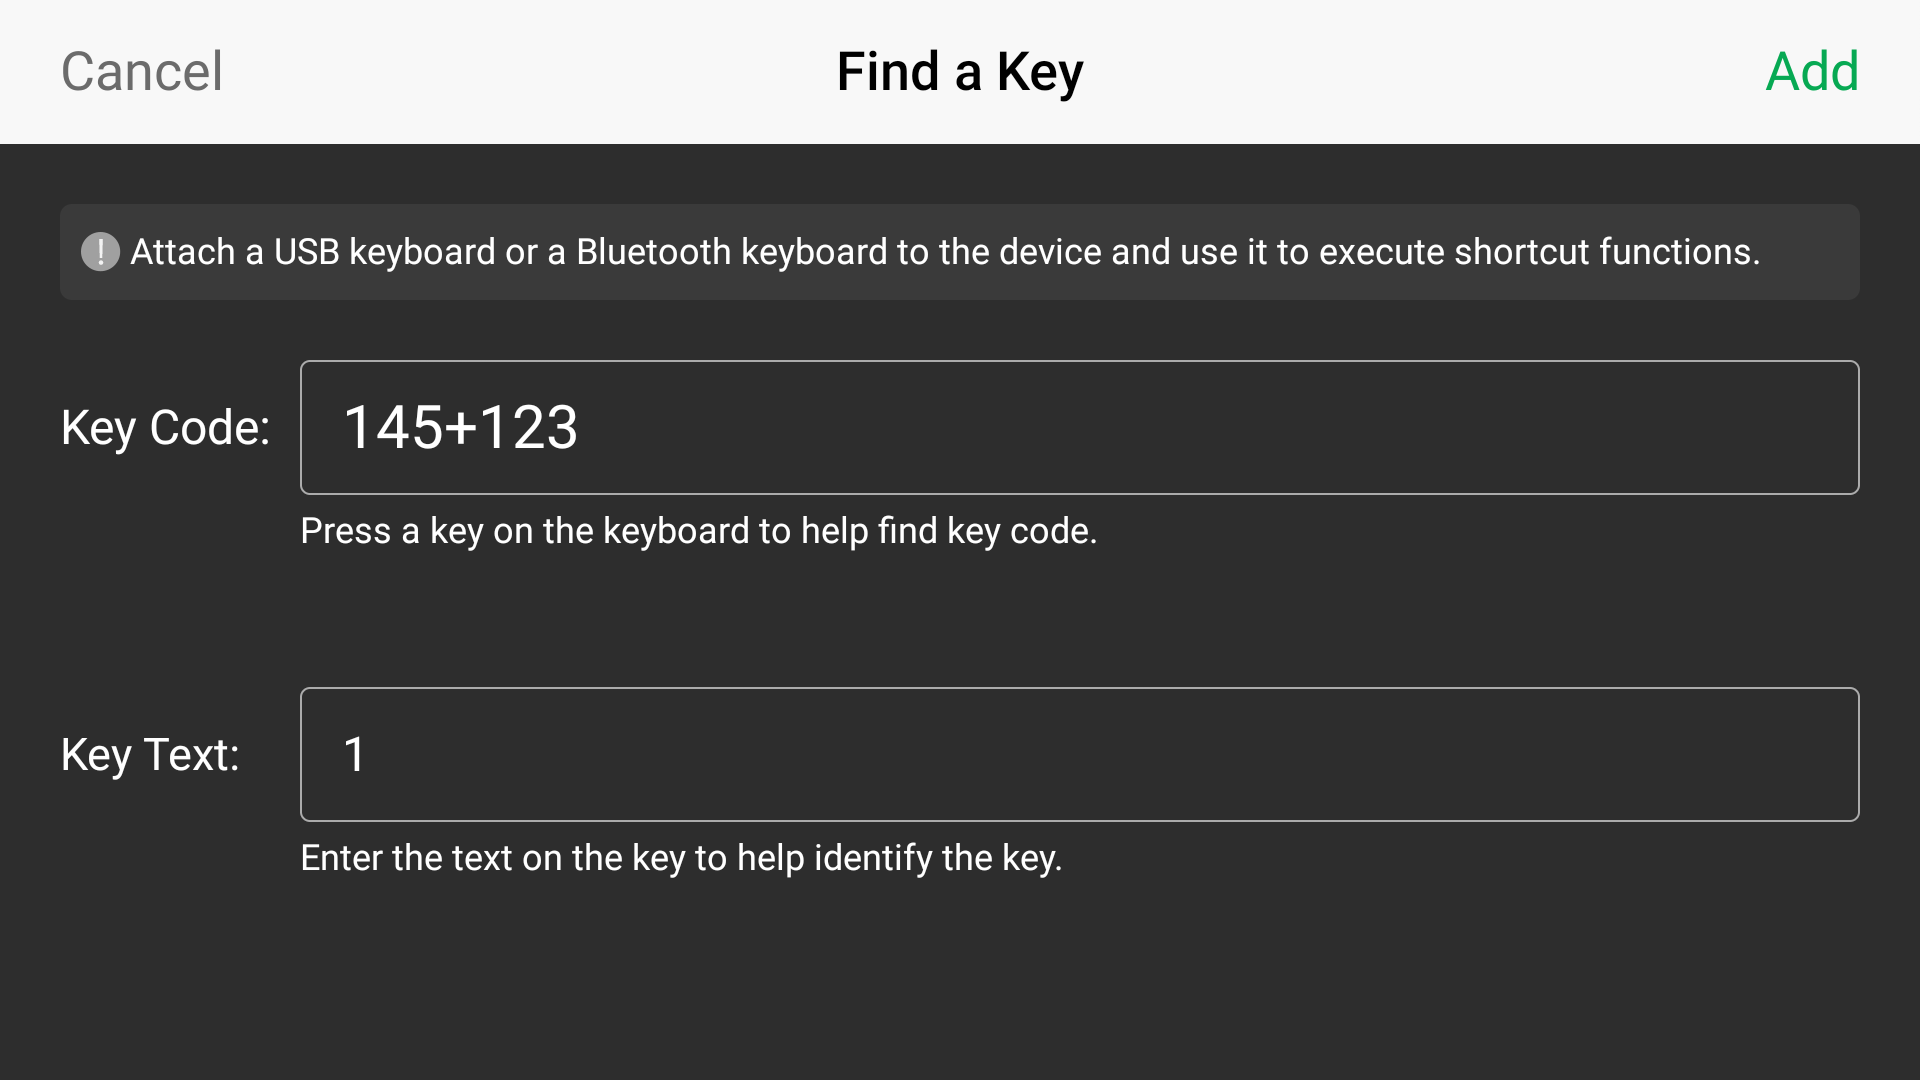
- Press a key on the keyboard to find the key code, or you can enter a key code number. You can also press two or more keys at the same time.
- Enter the key text on the key to help identify the key. You can also customize the text.
- Tap Add to confirm.
- Tap Save in the upper right corner to finish adding this shortcut.
- Repeat steps above to add more shortcuts.
Shortcut list:
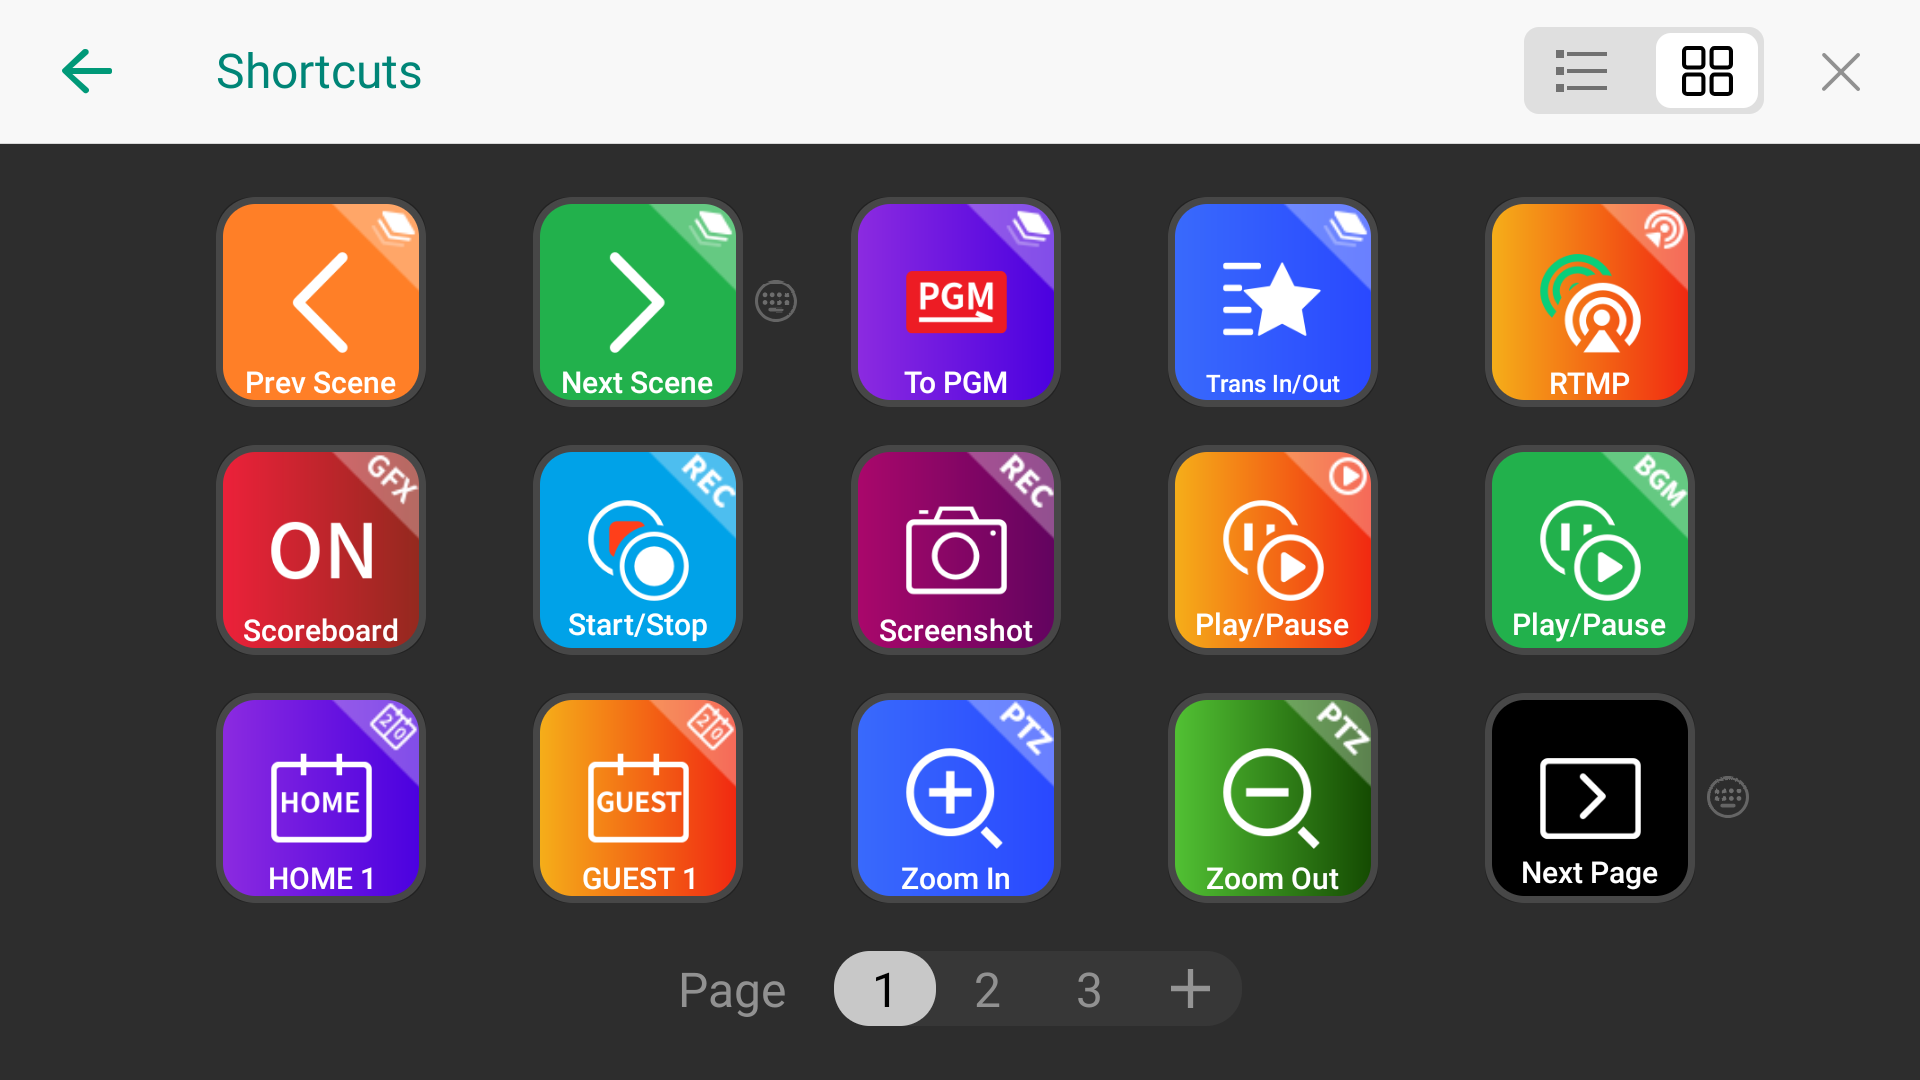
- Long-press and drag an icon to reorder it.
- Long-press an icon and tap "Edit" in the pop-up menu to edit the shortcut.
- Long-press an icon and tap "Delete" in the pop-up menu to delete the shortcut.
- Tap the page number at the bottom to switch pages.
- Tap the "+" at the bottom to add more pages.
- Long-press a page number and then tap "Delete" to delete the page and all shortcuts on it.
- Tap the buttons in the upper right corner to switch between list mode and thumbnail mode.
Call Shortcuts
- Press a key on the keyboard.
- On the main screen, tap
 > Shortcuts to call out the shortcut control page, and then tap a shortcut.
 - Click a shortcut in the Shortcut tab on the Produce page of Web UI.
- Open the Remote Assistant of Director Utility app, tap
 > Shortcuts, and then tap a shortcut.
Note: Since V3.2, it does not force users to specify key codes and key texts for shortcut keys. If the device is downgraded to version 3.1 or lower, as lower versions require key codes and key texts to be specified for shortcut keys, issues like failure to change the background color may arise. You can resolve this problem by specifying key codes and key texts for the shortcut keys.
E.g. 2: Add Shortcuts on Web UI (V3.1 and below):
- Click the Shortcuts tab on the Produce page of Web UI.
- Click Add.
- Enter a custom name for your shortcut.
- Click Add Function, and then click the drop-down box of Function to select a function. As some functions may need more selections or operations, follow the on-screen guide to continue. Click Add.
- To add more functions for the shortcut, repeat step 4.
You can add up to 3 functions for one shortcut. When you press the key, it executes all the functions at the same time.
Besides, it provides the extra 'Wait' function which can be added between each two functions. By setting the wait duration, a group of functions can be activated sequentially with a single press, allowing them to take effect one by one. - Click Find a key for the shortcut.
- Press a key on the USB keyboard to help find the key code, or you can enter a key code number. You can also press two or more keys at the same time
- Enter the key text on the key to help identify the key. You can also customize the text.
- Click Add to confirm.
- Click Add to finish adding this shortcut.
- Repeat step 2 to 7 to add more shortcuts.
- The shortcut list displays all the shortcut keys (including key text and the custom name) and their functions. Click a shortcut or press a key to test whether the shortcut works normally.
- (Optional) Click Key Code at the upper left corner to display or hide key code.
Visit Shortcuts for Director Mini/Director One or Shortcuts for Director Plus, to knew more about the full list and function descriptions.
Has your problem been solved?