Using Magewell MWCapture SDK for Capturing, Rendering and Encoding 4K@60Hz Video with GPU on a Mac Computer
As the infrastructure upgrades and expands capacity, 4K signals are becoming increasingly popular in various sectors. This poses new challenge for developers to render and encode video, since 4K data is four times the size of Full HD data (1920x1080). The rapid development of GPU technology in recent years has made GPU developers’ top choice as a tool for video encoding. If the 4K@60Hz signal can be processed by GPU, it will relieve the burden from the CPU, thus improving product stability and saving overall costs. This article will focus on how to use Magewell MWCapture SDK to implement the capture, rendering, and encoding of one-channel 4K@60Hz signal using the GPU on a Mac computer.
What is MWCapture SDK?
MWCapture SDK is a set of software libraries and procedures for implementing capture, encoding, rendering functions of Magewell I/O products. It is intended to help developers quickly optimize applications. The software libraries provide Magewel custom APIs for you to integrate the functions of capture devices into your applications, such as capturing A/V, obtaining information about the input signal, and setting the signal source. You can directly use these procedures, or refer to these procedures when building your own application. The functions available depend on the model of the capture card you have, firmware version, and driver, and your hardware configuration,
Depending on the compatibility of the capture device you use, the library functions can be one of following:
- MWCapture SDKv3 Universal Functions
- MWCapture SDKv3 Pro Capture Functions
- MWCapture SDKv3 USB Family Functions
Preparing the Software, Hardware, and Development Environment
Hardware configuration:
- Capture card: Pro Capture HDMI 4K Plus LT, or Pro Capture SDI 4K Plus (or, if your hardware configuration allows, Pro Capture Dual HDMI 4K Plus LT or Pro Capture Dual SDI 4K Plus for two-channel 4K signal capture)
- Mac computer: The following configurations have been tested to support 4K@60Hz capture, rendering and encoding.
When the encoding format is H.264:
Mac mini (2018)
CPU: Quad-Core Intel Core i5
Memory: 2GB
GPU: Intel UHD Graphics 630 1536MB
iMac (2019)
CPU: 6-Core Intel Core i3
Memory: 8GB
GPU: AMD Radeon Pro 570X
When the encoding format is H.265:
iMac Pro (2019)
CPU: Intel Xeon 8 Core Processor
Memory: 32GB
GPU: AMD Radeon Vega 56
Software configuration:
We recommend the AVCapture procedure in the MWCapture SDK be used for testing. This procedure has been tested by Magewell in detail and has proved capable of giving full play to GPU performance to achieve expected functions.
Development environment:
MacOS: 10.11 or above
Xcode: compatible with the installed macOS
AVCapture Architecture
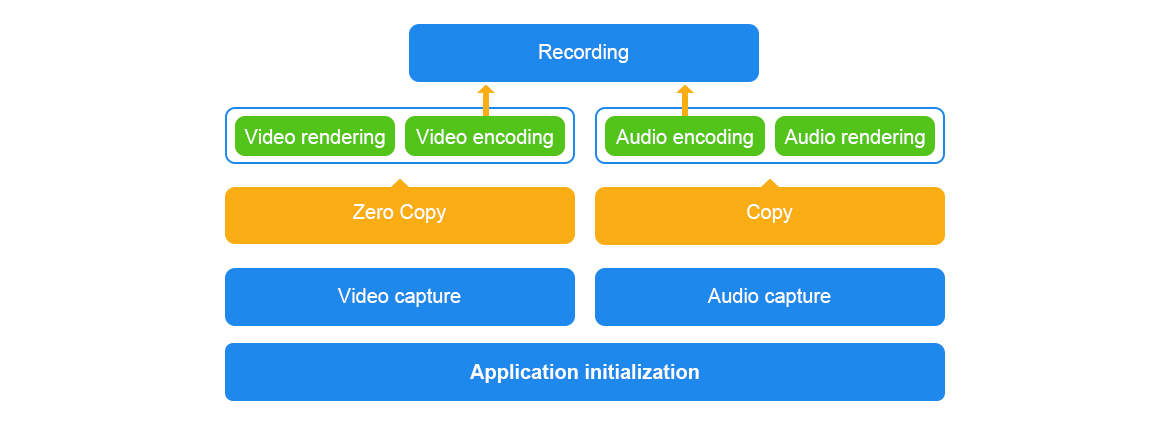
Steps to Use the AVCapture
Video capture
Video capture is implemented using Magewell proprietary capture APIs. The steps are as below:
- Create a timer.
- Set the time for triggering the timer, and wait for the triggering. Note that the time here is the onboard time of the capture card instead on of the time in the host system. The time can be obtained by invoking the MWGetDivceTime function.
- After the timer is triggered, invoke the MWCaptureVideoFrameToVirtualAddressEx function to capture a frame of video. The MWCaptureVideoFrameToVirtualAddressEx function is non-blocking. It responds immediately after invoked. Note that Magewell proprietary API does not collect video data using callback. Instead, the API proactively invokes a function. This, combined with the timer, allows capturing any frame rate.
- Invoke the MWWaitEvent function, wait for the capture to complete and release occupied resources.
Note: The capture APIs provided by MWCapture SDK are consistent across different platforms (Windows, Linux, and macOS), so the video capture code in the AVCapture procedure can be ported to any platforms for use. However, the video rendering and encoding APIs mentioned in this document use macOS-specific APIs, and are not compatible with the Windows and Linux platforms.
The following is the major part of the code for capturing one frame of video:
while (self.running) {
        llExpireTime = llExpireTime + dwFrameDuration;

        LONGLONG llCurrentTime = 0LL;
        xr = MWGetDeviceTime(self.hChannel, &llCurrentTime);
        if (xr != MW_SUCCEEDED) {
            llExpireTime = 0LL; usleep(10000);
            continue;
        }

        if (llExpireTime < llCurrentTime) {
            llExpireTime = llCurrentTime;
        }
        xr = MWScheduleTimer(self.hChannel, hTimerNotify, llExpireTime);
        if (xr != MW_SUCCEEDED) {
            llExpireTime = llCurrentTime;
            continue;
        }

        DWORD dwRet = MWWaitEvent(hTimerEvent, 1000);
        if (dwRet <= 0) {
            continue;
        }
        ........

        if (frame->pixelBuffer) {
            ........
            xr = MWCaptureVideoFrameToVirtualAddressEx(self.hChannel,
                               MWCAP_VIDEO_FRAME_ID_NEWEST_BUFFERED,
                               byBuffer,
                               dwFrameSize,
                               cbStride,
                               FALSE,
                               (MWCAP_PTR64)pixelBuffer,
                               self.fourcc,
                               self.width,
                               self.height,
                               0,
                               0,
                               NULL,
                               NULL,
                               0,
                               100,
                               0,
                               100,
                               0,
                               MWCAP_VIDEO_DEINTERLACE_BLEND,
                               MWCAP_VIDEO_ASPECT_RATIO_IGNORE,
                               &rcSrc,
                               NULL,
                               0,
                               0,
                               MWCAP_VIDEO_COLOR_FORMAT_UNKNOWN,
                               MWCAP_VIDEO_QUANTIZATION_UNKNOWN,
                               MWCAP_VIDEO_SATURATION_UNKNOWN);
            MWWaitEvent(hCaptureEvent, -1);
            CVPixelBufferUnlockBaseAddress(frame->pixelBuffer, 0);

           ........
        }
    }
   ........
 } while (FALSE);
Video rendering
The AVCapture procedure has optimized video rendering by encapsulating the video data pointer as the CMSampleBufferRef class and passing the class to the renderer for rendering. The CMSampleBufferRef class only references original video data, so there would be no data copy during the process.
if (self.viewEnable) {
    CMSampleTimingInfo timing = {kCMTimeInvalid, kCMTimeInvalid, kCMTimeInvalid};
    CMVideoFormatDescriptionRef videoInfo = NULL;
    CVReturn result = CMVideoFormatDescriptionCreateForImageBuffer(NULL, frame->pixelBuffer, &videoInfo);

    CMSampleBufferRef sampleBuffer = NULL;
    result = CMSampleBufferCreateForImageBuffer(kCFAllocatorDefault, frame->pixelBuffer, true, NULL, NULL, videoInfo, &timing, &sampleBuffer);
    CFRelease(videoInfo);

    CFArrayRef attachments = CMSampleBufferGetSampleAttachmentsArray(sampleBuffer, YES);
    CFMutableDictionaryRef dict = (CFMutableDictionaryRef)CFArrayGetValueAtIndex(attachments, 0);
    CFDictionarySetValue(dict, kCMSampleAttachmentKey_DisplayImmediately, kCFBooleanTrue);

    if (self.videoLayer) {
        [self.videoLayer enqueueSampleBuffer:(CMSampleBufferRef)sampleBuffer];
    }

    CFRelease(sampleBuffer);
}
Video encoding
AVCapture has made the following optimization on video encoding: Start a dedicated thread for video encoding, since the encoding can involve a great amount of computation.
if (self.audioCaptureThreadId == 0) {
    pthread_t tid = 0;
    if (0 == pthread_create(&tid, NULL, onVideoEncodeThreadProc,  (__bridge void*)(self))) {
       self.audioCaptureThreadId = tid;
    }
}
After capturing the data of a frame, move the data pointer to a queue. The encoding thread will obtain the data pointer from the queue and send it to the encoder for encoding. Since data is transferred as pointers, there is also no data copy in the process.
 [self.vtEncLock lock];
if (self.vtEnc) {
    ((std::queue > *)self.encPixelFrameQueue)->push(frame);
    while(((std::queue > *)self.encPixelFrameQueue)->size() > MAX_VIDEO_ENCODE_BUFFER_FRAMES) {
        ((std::queue > *)self.encPixelFrameQueue)->pop();
    }
}
[self.vtEncLock unlock];
Core code for the encoding thread
std::queue > *encQueue = (std::queue > *)self.encPixelFrameQueue;

while (self.encoding) {
    std::shared_ptr frame;

    [self.vtEncLock lock];
    if (!encQueue->empty()) {
        frame = encQueue->front();
    }
    [self.vtEncLock unlock];

    if (frame != NULL && frame->pixelBuffer) {
        if (self.vtEnc) {
            //printf("put video frame:%lld\n", frame->timestamp);
            mw_venc_put_imagebuffer(self.vtEnc, frame->pixelBuffer, frame->timestamp);
        }

        [self.vtEncLock lock];
        encQueue->pop();
        [self.vtEncLock unlock];

        ........
    } else {
        usleep(5000);
    }
}
All in all, to preview and record 4K@60Hz video simultaneously, it is of paramount importance to reduce video data copying as much as possible or even achieve zero-copy, so that the performance can be optimized to the maximum.