- From the navigation bar, click the Video tab.
-
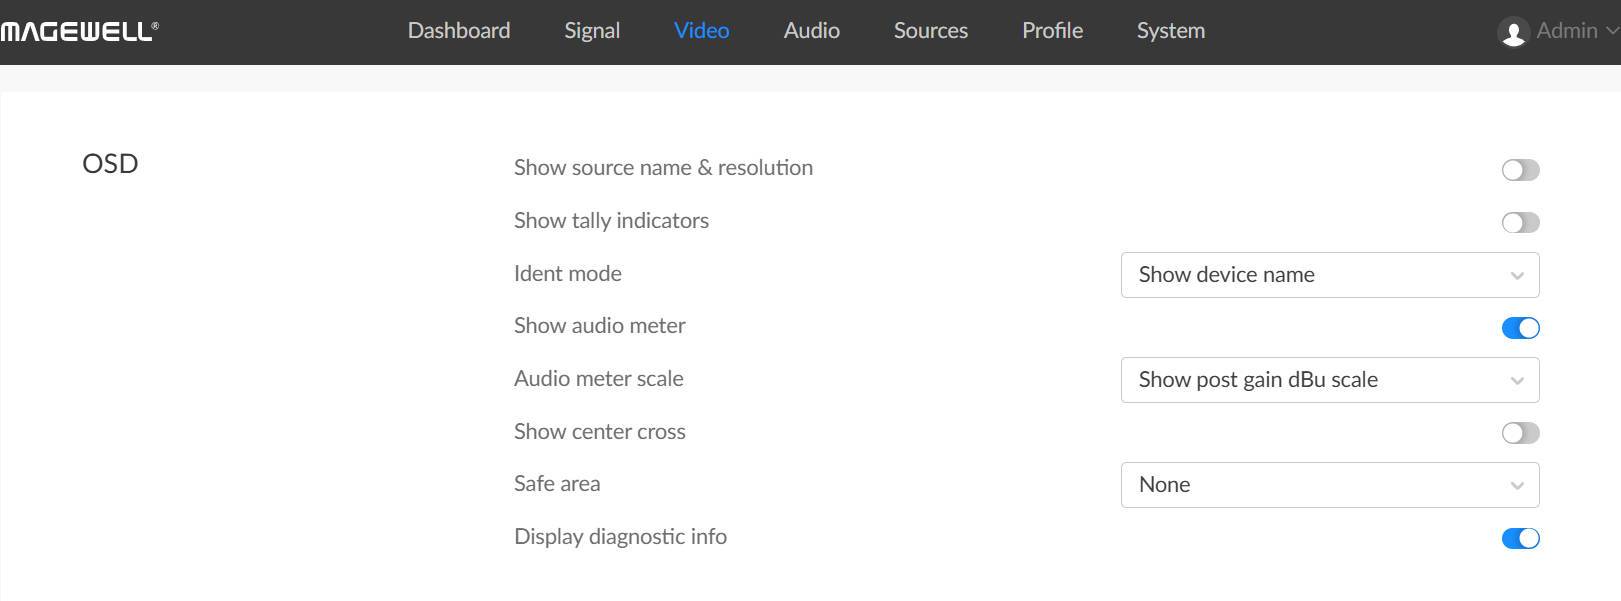
Configure On-Screen Display (OSD).
![]()
Show source name & resolution
Turn on the switch to show current decoded stream name at the top of the output display. By default, it is off.
Show tally indicators
NOTE: This function is ONLY available for NDI® decoders.
Turn on the switch to show the "on-air" status of selected stream at the top field of the output. If being previewed, it is PREVIEW; if being on-air, it is PROGRAM. The indicators both show if the source is being previewed and streaming simultaneously; otherwise, there is nothing displayed. By default, it is off.
Ident mode
Choose to show/hide the device name or ident text that overlays the output. It is used to separate multiple decoders from each other when they are working together. By default, it is Hide.
The device name can be modified in the System tab with administrative rights. The steps refer to Setting Device Name.Ident text can be edited in the Ident text option.
Ident text
Custom digital label overlaid on the output. By default, it is null. The text will be overlaid on the output when the Ident mode is set to Show ident text.
-
Show audio meter
Check the box to show the volume bar on the left side of presentation screen. By default, it is overlaid on the output.
Audio meter scale
Choose the scale for the measurement of the volume.
If CONVERT MODE in the Audio tab is EBU, options are Hide, Show post gain dBu scale, and Show post gain dBFS scale. If audio gain is set, the Show post gain dBu scale, and Show post gain dBFS scale will show the gain effect. By default, it is Hide.
If CONVERT MODE in the Audio tab is SMPTE, options are Hide, Show post gain dBVU scale, and Show post gain dBFS scale. If audio gain is set, the Show post gain dBVU scale, and Show post gain dBFS scale will show the gain effect. By default, it is Hide.
- Show center cross
Turn on the switch to overlay the center cross on the output screen which determines the center position of the entire image, helps with interlaced scans check and static convergence.
-
Safe area
It ensures that the most important parts of the picture are seen by the majority presentation device. Choose from None, Show 80% center view area, Show 4:3 aspect ratio area, and Show square aspect ratio area. By default, it is None.
Display Diagnostic Information
Overlay the status of the data source being decoded on the output image. Not displayed by default.
-
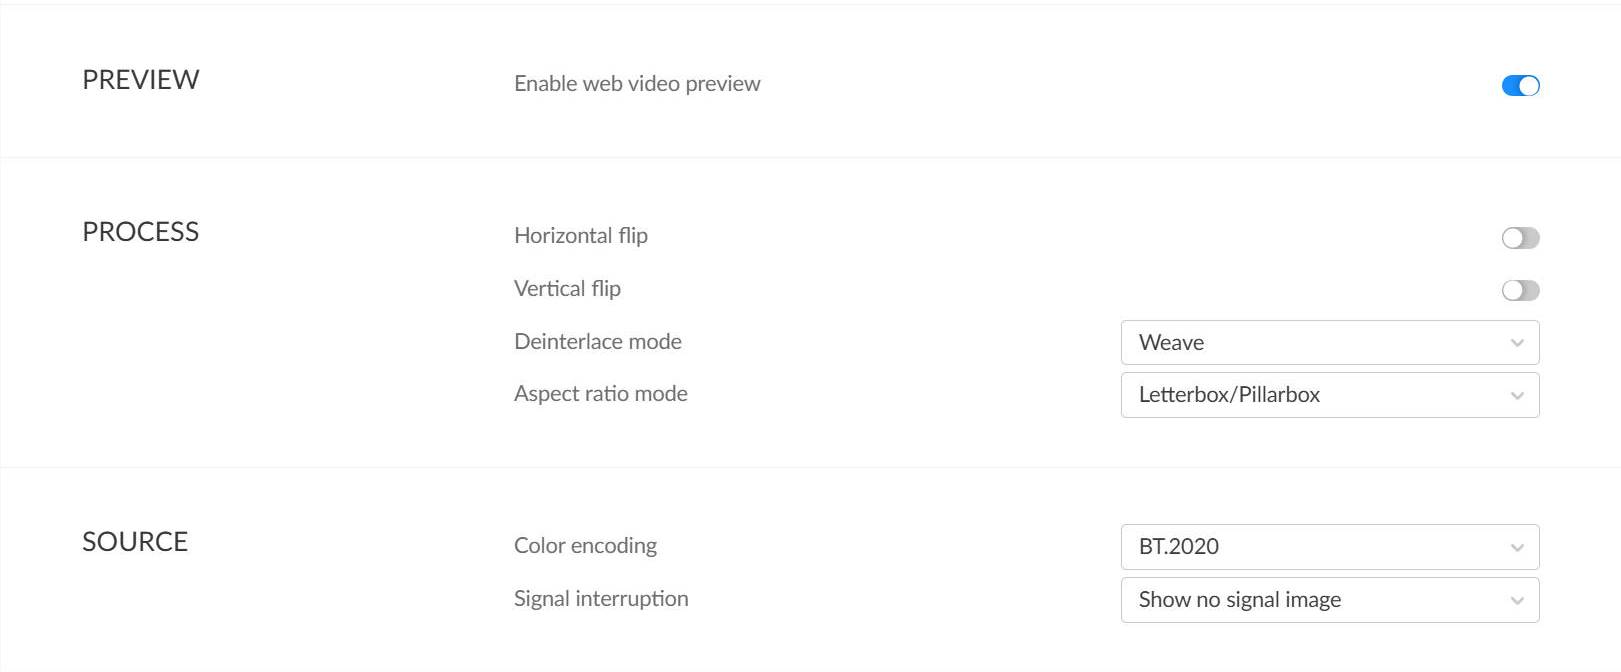
Set Web Preview.
Web video preview is enabled by default. When disabled, video preview cannot be performed in the Web UI.
-
Set Video Processing.
![]()
- Horizontal flip: Mirrors the image horizontally.
- Vertical flip: Flips the image vertically.
-
Deinterlace mode:
- Default: "Bob".
- Weave: Merges two consecutive fields into one frame. Suitable for static images or scenarios requiring original data.
- Bob: Duplicates single field data to form a complete frame, suitable for processing dynamic images.
- Blend: Generates progressive frames by blending and overlaying image information from adjacent fields. Suitable for static or slow-motion scenes that do not require high dynamic detail and focus more on reducing flicker and aliasing.
-
Aspect ratio mode:
- Default: Letterbox/Pillarbox mode
- Letterbox/Pillarbox Mode: Maintains the source image aspect ratio by filling with black borders to fit the presentation output. Letterbox mode fills the top and bottom with black bars, while pillarbox mode fills the left and right sides. This option is used by default.
- Full Screen: Stretches the video image to fill the entire presentation screen.
- Zoom/Crop: Converts the source video aspect ratio to the output aspect ratio through scaling and cropping.
-
Set Source Parameters.
- Color encoding: Auto, BT.601, BT.709, or BT.2020. By default, it is set to Auto, where the decoder automatically adapts according to the signal type. SD signals use BT.601, HD signals use BT.709, and HDR10 signals use BT.2020.
- Signal interruption: Display no-signal image, black screen, last frame, or disable output. When set to Disable output, the output device will enter power saving mode if there is no signal.
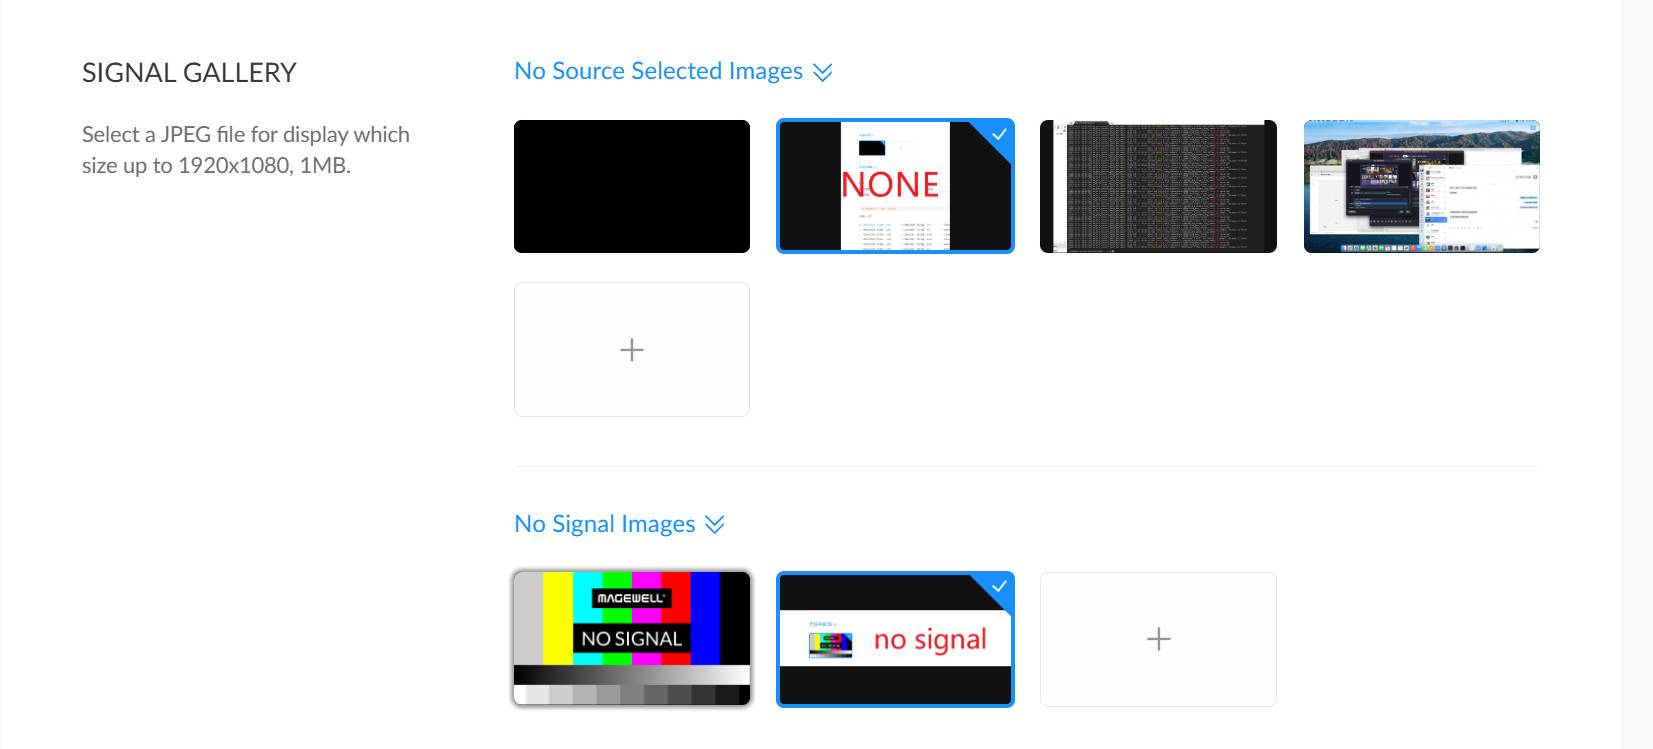
Signal Gallery Management
![]()
- The device provides 1 default image for "no source selected" and 1 for "no signal", which cannot be deleted.
- Click "+" to upload up to 5 JPEG images each for "no source selected" and "no signal" screens. Image size should not exceed 1920x1080 or 1M.
- Click an image and confirm to apply it.
- Click the "Delete" button on an uploaded image to remove it. Images currently in use cannot be deleted.
-
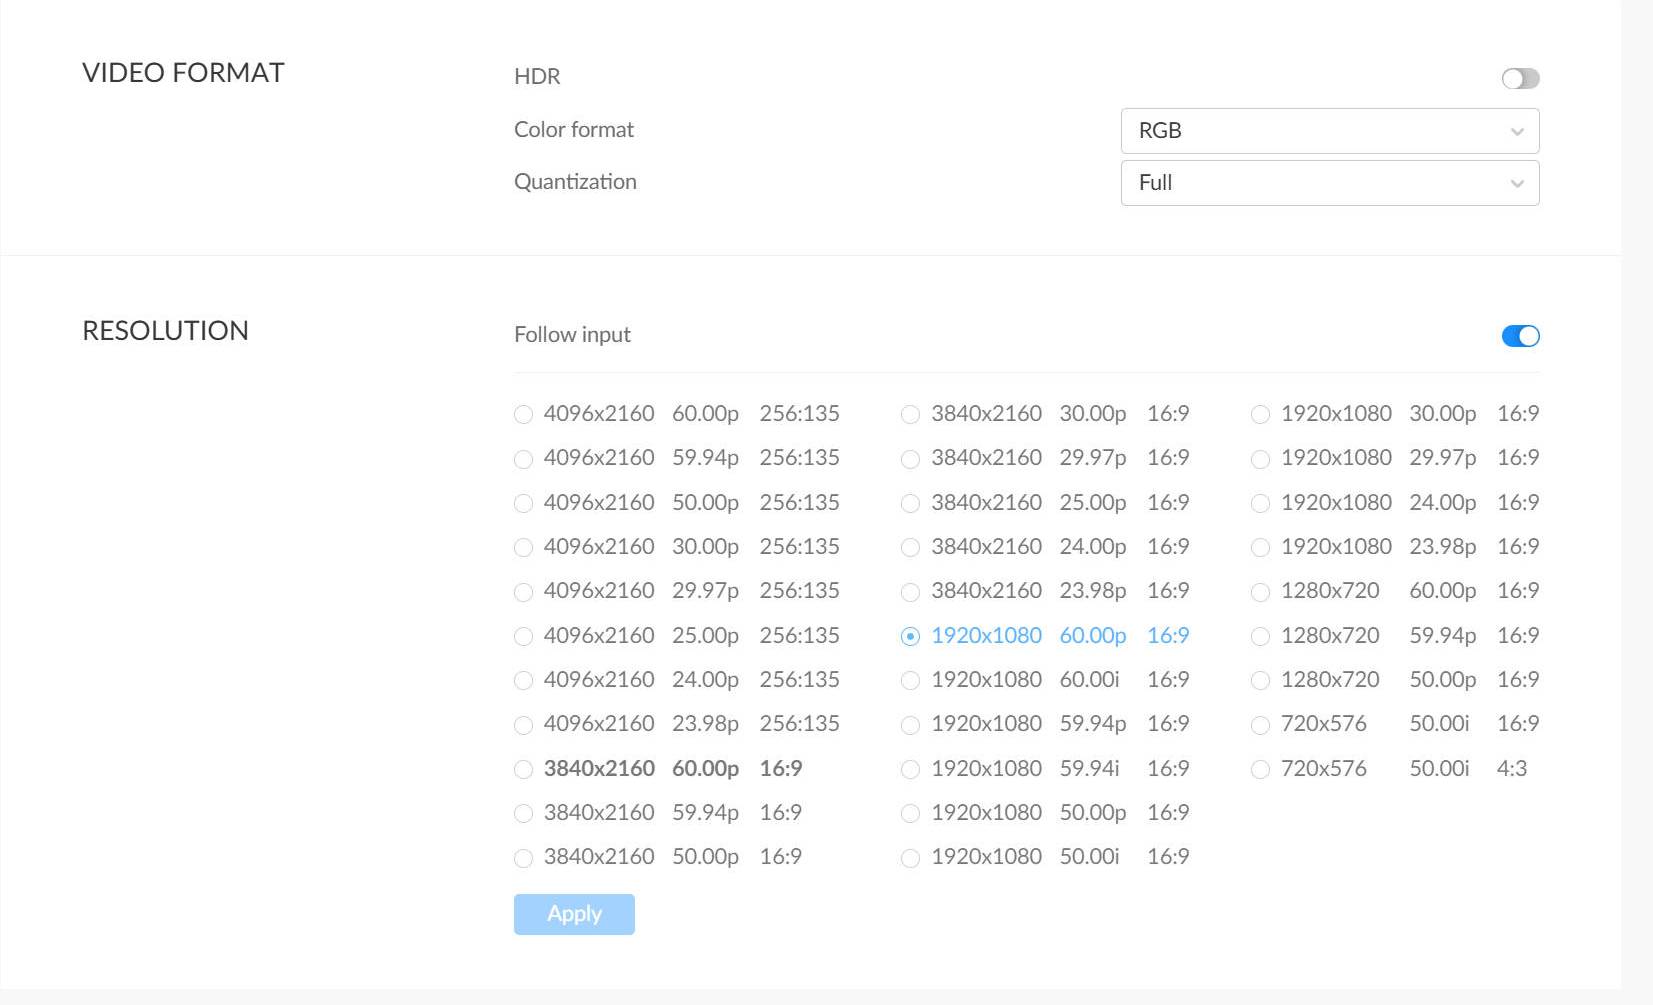
Set Output Video Format.
- HDR: Enables HDR10 output when supported by the display.
When the connected display supports HDR10, you can enable HDR to output video in HDR10 format. This feature is disabled by default.
Color format
You can set the color space to RGB, YUV444, or YUV422. The default is RGB. Please select the appropriate color space based on your display device.
Quantization
When the color space is set to RGB, you can set it to Full (default) or Limited.
-
Set Output Resolution.
![]()
The decoder supports matching the output resolution to the input signal. Available resolutions are determined by the connected display’s EDID.
For interlaced input and output, a buffer time of at least 100 ms is recommended to ensure signal stability.
Setting Video Parameters
Click the Video tab to configure video output and processing parameters.